Get Started with AWSH
| What will I learn? | Let's discover how to get started with AWSH in less than 10 minutes. We will load some AWS credentials and have a look around our AWS account. |
| Difficulty |
What you'll need
Software & Services
- Docker version 16.14 or above:
If you don't yet have Docker installed or access to Docker then you can follow the official documentation from the folks at Docker to find the right version for your operating system and get up and running
Permissions & Access
The built in ReadOnlyAccess IAM Policy provides all the permissions needed to get and collect data from the AWS APIs for now. You can attach this existing IAM Policy provided by AWS to the IAM User, Group or Role that corresponds to the identity that you have AWS credentials for.
For a full list of all the permissions being granted by this IAM Policy you can view the ReadOnlyAccess Policy in your AWS account
Tutorial
Starting AWSH
To run AWSH in its simplest form just launch a new terminal from within your Operating System and start the AWSH Container directly
docker run -it --rm hestio/awsh
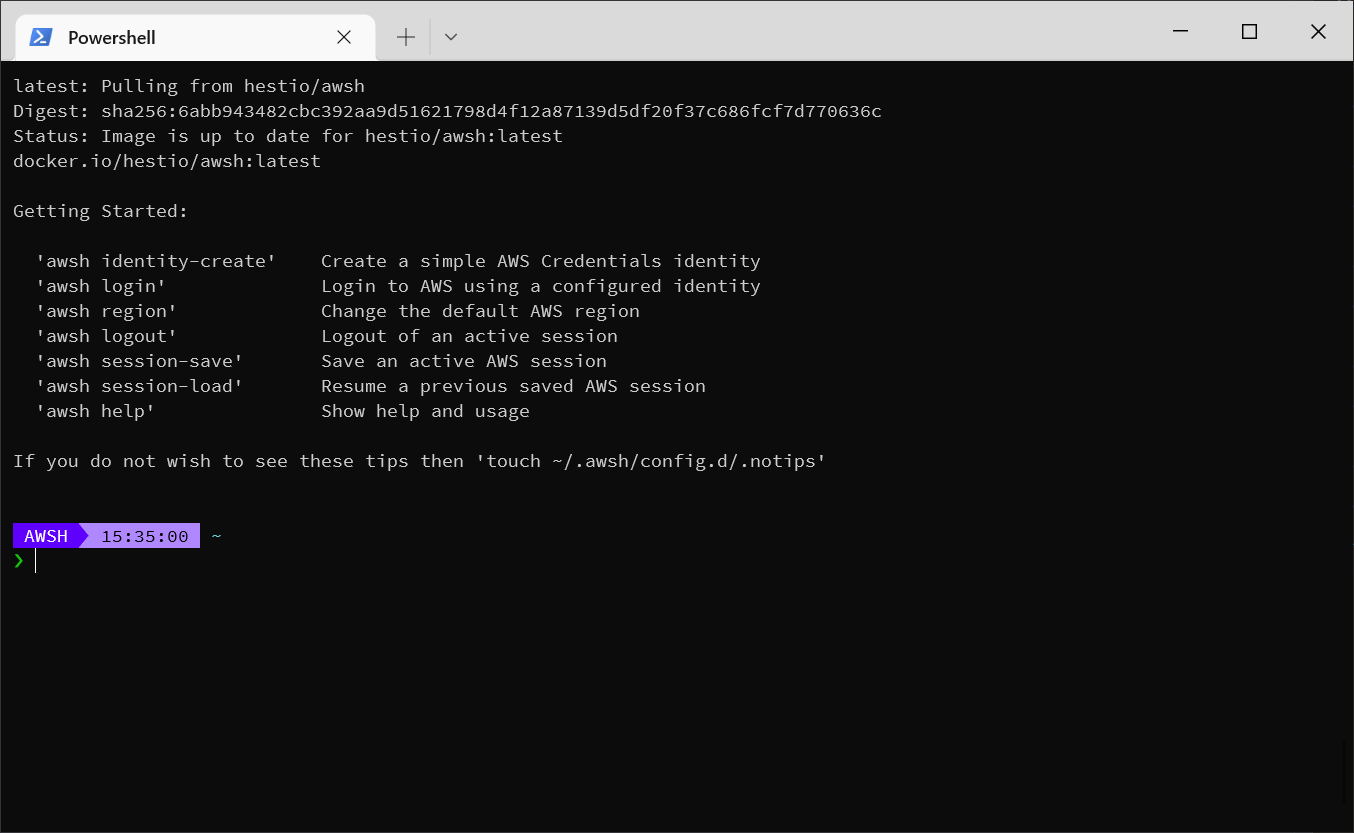
Running that command should give you a terminal window with a running instance of AWSH
Glyph symbols
Why don't I see a glyph symbol in my prompt?
The most common cause of this is system misconfiguration. Some Linux distros in particular do not come with font support out-of-the-box. You need to ensure that:
- Your locale is set to a
UTF-8`` value, likede_DE.UTF-8orja_JP.UTF-8`. If LC_ALL is not a UTF-8 value, you will need to change it. - You have an emoji font installed. Most systems come with an emoji font by default, but some (notably Arch Linux) do not. You can usually install one through your system's package manager.
- You have a Font with support for Powerline symbols (Nerd Fonts) installed
- Your terminal emulator is configured to use the Font with Powerline symbols
To test your system, run the following commands in a terminal:
echo -e "\xf0\x9f\x90\x8d"
echo -e "\xee\x82\xa0"
The first line should produce a snake emoji, while the second should produce a powerline branch symbol. If either symbol fails to display correctly, your system is still misconfigured. Unfortunately, getting font configuration correct is sometimes difficult.

Persistent data
Using AWSH without any data or configuration persistance is probably not what you want. You will benefit much more from having your configuration persist between sessions so that you can resume right where you left off next time you launch AWSH again
To do that we will create a simple wrapper script awsh that will create a persistent data store and share some useful files you have in your HOME directory with the AWSH container.
- Windows (WSL)
- MacOS
- Linux
# Ensure paths exist
if (-not (Test-Path "${env:USERPROFILE}\.awsh\identities")) {
    New-Item -ItemType Directory -Path "${env:USERPROFILE}\.awsh\identities" | Out-Null
}
if (-not (Test-Path "${env:USERPROFILE}\workspace")) {
    New-Item -ItemType Directory -Path "${env:USERPROFILE}\workspace" | Out-Null
}

# Ensure config files exist
if (-not (Test-Path "${env:USERPROFILE}\.bashrc_local")) {
    New-Item -ItemType File -Path "${env:USERPROFILE}\.bashrc_local" | Out-Null
}
if (-not (Test-Path "${env:USERPROFILE}\.netrc")) {
    New-Item -ItemType File -Path "${env:USERPROFILE}\.netrc" | Out-Null
}
if (-not (Test-Path "${env:USERPROFILE}\.terraformrc")) {
    New-Item -ItemType File -Path "${env:USERPROFILE}\.terraformrc" | Out-Null
}

# Start the container
docker run `
    -it `
    --rm `
    --network=host `
    -v "${env:USERPROFILE}\.awsh:/home/awsh/.awsh" `
    -v "${env:USERPROFILE}\.bashrc_local:/home/awsh/.bashrc_local" `
    -v "${env:USERPROFILE}\.netrc:/home/awsh/.netrc" `
    -v "${env:USERPROFILE}\.terraformrc:/home/awsh/.terraformrc" `
    -v "${env:USERPROFILE}\workspace:/home/awsh/workspace" `
    -v "${env:TEMP}:/tmp" `
    -e "HOME=/home/awsh" `
    -e "http_proxy=${env:http_proxy}" `
    -e "https_proxy=${env:https_proxy}" `
    -e "no_proxy=${env:no_proxy}" `
    hestio/awsh
#!/usr/bin/env bash

PUID=$(id -u)
PGID=$(id -g)

# Ensure paths exist
[ -d "${HOME}/.awsh/identities" ] || mkdir -p "${HOME}/.awsh/identities"
[ -d "${HOME}/workspace" ] || mkdir -p "${HOME}/workspace"

# Ensure config files exist
touch ${HOME}/.bashrc_local ${HOME}/.netrc ${HOME}/.terraformrc

# Start the container
docker run \
    -it \
    --rm \
    --network=host \
    --user ${PUID}:${PGID} \
    -v ${HOME}/.awsh:/home/awsh/.awsh \
    -v ${HOME}/.bashrc_local:/home/awsh/.bashrc_local \
    -v ${HOME}/.netrc:/home/awsh/.netrc \
    -v ${HOME}/.terraformrc:/home/awsh/.terraformrc \
    -v ${HOME}/workspace:/home/awsh/workspace \
    -v /tmp:/tmp \
    -e "HOME=/home/awsh" \
    -e "PUID=${PUID}" \
    -e "PGID=${PGID}" \
    -e "http_proxy=${http_proxy}" \
    -e "https_proxy=${https_proxy}" \
    -e "no_proxy=${no_proxy}" \
    hestio/awsh
Now that we've created our wrapper script we can use it to launch a new AWSH session and start using it with AWS
Running that command should give you a terminal window with a running instance of AWSH and map in several useful paths from your HOME directory that are commonly used by many of the tools in the AWS ecosystem.
If you'd like the ability to add or import other customizations to your AWSH sessions you can take advantage of the hook built into both AWSH and BLOX that will check for the existance of ${HOME}/.bashrc_local on startup and process it as part of normal shell init
#!/bin/bash

## Aliases
alias vim="vi"

cat > ~/.gitconfig <<EOF
[credential "https://git.com"]
  username = lukasz.czarnota@hestio
  helper = store
[user]
  name = Lukasz Czarnota
  email = lukasz.czarnota@hestio
EOF
For more detailed information please see the full documentation here. For now, let's continue with loading some credentials and having a look around.
Load some AWS credentials
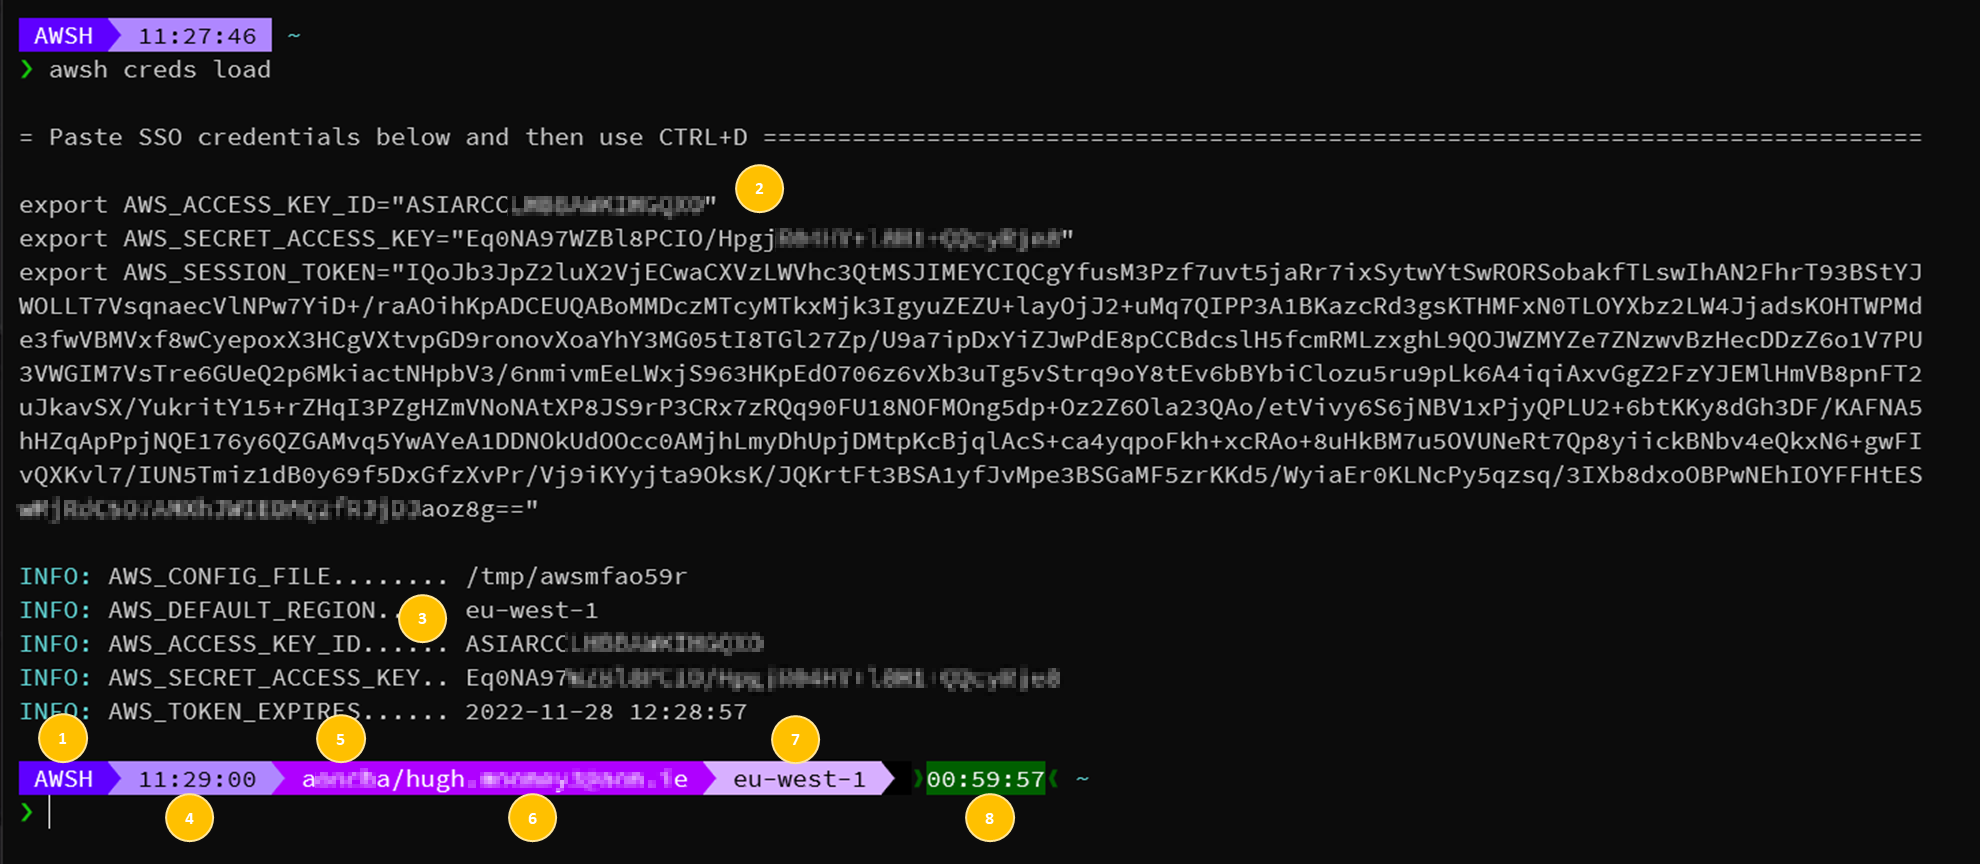
At the AWSH prompt, load some existing credentials for your AWS account. These can be IAM User or IAM STS Temporary credentials. Simply paste them into the AWSH terminal and use CTRL+D when done.
awsh creds load
Once you have loaded some credentials your default terminal prompt will update to provide more useful information to help you navigate AWS at the CLI. Let's have a look;

- Which container you are using. This will be
BLOXorAWSHdepending on which set of containerized tools you are using - AWS credentials, either from temporary (STS) or persistent (IAM User) API access
- Once loaded, some summary information about the credentials is shown for use with any AWS tooling that does not support the default order of precedence (command line -> environment -> files)
- Time. Yes, boring maybe but it is extremely useful when reviewing how long commands took to complete previously. Some of those API calls to manage AWS resources can take up to an hour!
- AWS Account alias.
- The name of the AWS identity that the credentials provided are for
- The default AWS Region that will be used when not adding
--region ab-cdef-nto any commands - The remaining duration on your temporary credentials if known.
Basic Usage
Each of the helper commands present in AWSH can be invoked using
AWSH❯awsh <command>To find a complete list of all of the available commands you can use the auto-complete built into the CLI (Default:
TAB-TAB) after typingawshAWSH❯awsh <TAB><TAB>
acm-import-certificate report-access sg-revoke-rules
auth-report report-ec2-lb ssh
creds report-inventory subnet-claim-ip
dump-account report-s3-usage token-krb5formauth-create
identity-create scp token-mfaauth-create
list session-load vpc-viz
login session-purge whoami
logout session-save
region sg-addSome AWSH commands also support completions which can be surfaced in the same way (Default:
TAB-TAB) after typing a supported AWSH command (awsh list)AWSH❯awsh list <TAB><TAB>
acm ecs-task-definitions nacl
acm-detailed ecs-tasks natgw
alb eip network-prefix-list
alb-listener eks-addon-versions rds
ami eks-addons rds-detailed
batch-compute-environments eks-clusters rds-option-groups
batch-job-definitions eks-fargate-profiles rds-parameter-group
batch-job-queues eks-identity-provider-configs rds-snapshot
batch-jobs eks-nodegroups rds-subnet-groups
cgw eks-updates redshift-snapshot
cloudtrail elb route-table
costs-by-month-and-service elb-detailed route-table-routes
fsx route53-zone
dx-connection iam-access-keys s3bucket
dx-interface iam-account-password-policy s3hm
ebs-snapshot iam-account-summary sg
ebs-snapshot-detailed iam-cert sg-rules
ebs-volume iam-groups ssm-instances
ebs-volume-detailed iam-groups-policy-attachments subnet
ec2-instance iam-groups-users tgw
ec2-instance-detailed iam-instance-profile tgw-gateway-attachments
ec2-instance-ssm-status iam-policies tgw-gateway-vpc-attachments
ecs-attributes iam-role tgw-route-table
ecs-capacity-providers iam-role-policy-attachments tgw-route-table-routes
ecs-clusters iam-user vpc
ecs-container-instances igw vpc-endpoints
ecs-describe-clusters kms-alias vpn
ecs-services kms-key vpngw
ecs-task-definition lambda
ecs-task-definition-families lambda-detailed
Examples
Some commands will require an active session with AWS to ensure that you are not attempting to make AWS API calls without first being logged in

What identity is active?
AWSH❯awsh whoami❯ awsh whoami
UserId Account Arn
--------------------- ------------ ----------------------------------------------
AKIASP2TPHJSRXZCD6VR 123456789012 arn:aws:iam::123456789012:user/lukChanging the default AWS Region
AWSH❯awsh region
What VPCs are in this AWS Region?
AWSH❯awsh list vpcThere are lots of
listcommands available. For a complete reference, please refer to the User GuideWho has access to AWS?
AWSH❯awsh auth-reportSee dedicated tutorial AWSH Access Report
What is our AWS spend?
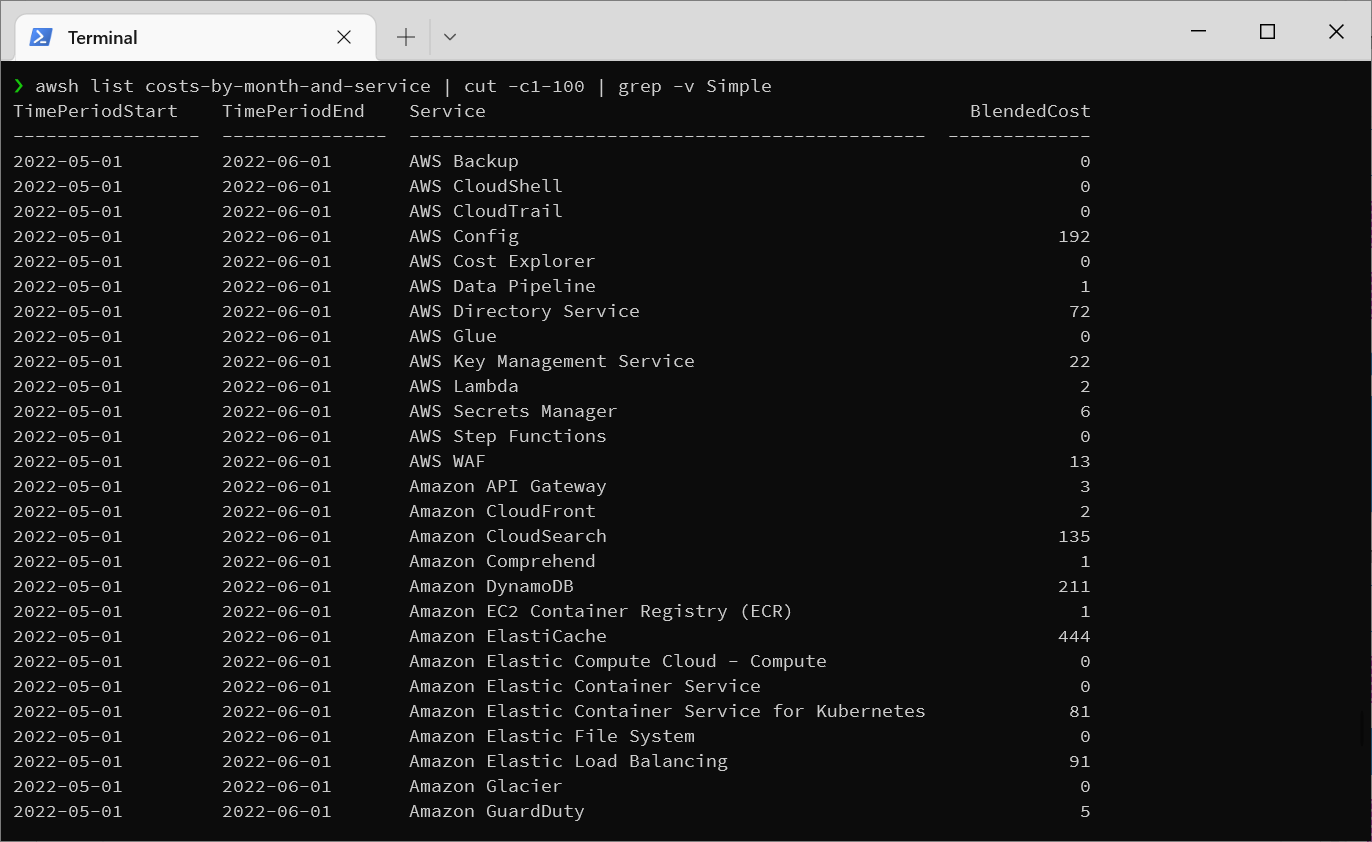
AWSH❯awsh list costs-by-month-and-service Screenshot: Example Output
See dedicated tutorial AWSH Inventory Report
Now that you've had a look around why not check out the full documentation here.
At Hestio, we have taken our experience with designing and building on cloud to codify these patterns and made them available as a low-code pattern library for AWS. Why spend time and effort on reinventing the wheel when it's already a solved problem? Would you start developing office productivity software in a world where Microsoft Office already exists?
If you'd like to find out about worX, our low-code patterns library for AWS you can read more here or get in touch today to schedule a demo.
If you'd like to find out more about the products and services Hestio has to offer, select one of the options below.


